Friday, April 29, 2016

Very Easy How to Make a Bristle bot

The title explains all , this post is about how to make  easy bristle bot without falling or rotating the same path without moving like an insect.

If you look other videos about making bristle bot at the end there are not much videos about real working because the bot either move some distance and fall or it moves in a predicted motion.

Yeah as you think the bristle bot is something easy to build, when we got the right components , what if we want to use the components that available readily to do it?

Yes still you can do it but it won't give you the expected result.

Here I've made a bristle bot which can be built less than 2 minutes. All you need is any *tooth brush, * vibrator, *button battery, *paper clips and a double sided tape and glue *LEDs to make it look cool compare to than other bristle bot.


This is how my bot was looked after I finished, Is it looking cool?? I love it when making it awaken the inner child in me.

Lets Make the bot,

Cut the head portion from your tooth brush (new one would be perfect for this )


add some glue to it and fix the vibrator


add the paper clips to the bot like it's getting wing


add battery and complete the bristle bot.


add the LED's to another battery like this. More the LEDs More the fun


cover the LEDs with double sided tape and place it over the vibrator

Number of attempts before this design

Very Easy How to Make a wireless Robot Without Microcontroller.

Have you tired of building robots with numerous coding and difficult circuits? want to make a cool wireless robot without a microcontroller , here it is for you.

A robot that does not need any sort of programming or complex circuit to build, This is a complete beginner robot, anyone can do this without much knowledge about electronics, all you need is right components and right placement of these components.

This is a simplest Wireless robot without a need for microcontroller, this can be made with readily available components . No need to solder your electronics components and its cheap to do .

check the video below and learn How to do this robot.


check this page for circuit diagram, its simply plug and play type bot, No need for the circuit diagram,  if you still want circuit for this robot check this Here

Components Need to Make this

RF Transmitter and Receiver Module

L293D Motor Driver

Push button and connecting wires

2 batteries

2x Motor

2x wheels 1x castor wheel

1x chassis


 If you don't want to place your phone like that or you don't have an android you can go for a wireless camera that is available cheaper on many electronics market,

If you add a camera to this robot , it become a cool surveillance robot , which can be operated from a 120 feet away from this robot. The distance is shorter but this is really cool for a hobbyist and beginner to give a try. Make this robot to stalk your pets at home :).

For queries feel free to leave comments below . subscribe to my youtube channel for regular updates or do check my channel for really easy to do type bots

Very Easy How to make a Sound Activated robot using Arduino


A simple sound activated bot, turn On when there is a sound and turn off if it hear sound again, It don't have any specific purpose just a toy with minimum intelligence lol.

This robot uses sound detecting sensor, which actually produces vibration whenever there is a noise, it cannot measure the db of the sound that producing, all it can do is to produce a signal when there is a sound


sound sensor


Arduino Program:
--------------------------------------------------------------------------------------------------------------------------

int Tomotor = 8;       // signal to motor driver
int soundsensor = 7;   // input from sound sensor

boolean state = false;

void setup()
{
  pinMode(Tomotor, OUTPUT);
  pinMode(soundsensor, INPUT);
}

void loop()
{
  if (digitalRead(soundsensor) == LOW)
  { 
    delay(100);                     
    state = !state;               
    digitalWrite(Tomotor, state);   
  }
}
--------------------------------------------------------------------------------------------------------------------------

Very Easy How to make a Obstacle Avoiding robot using arduino

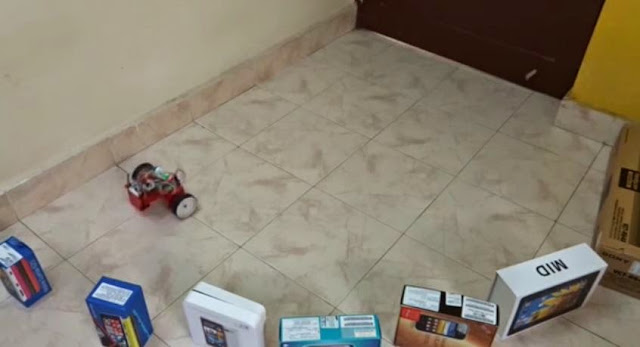
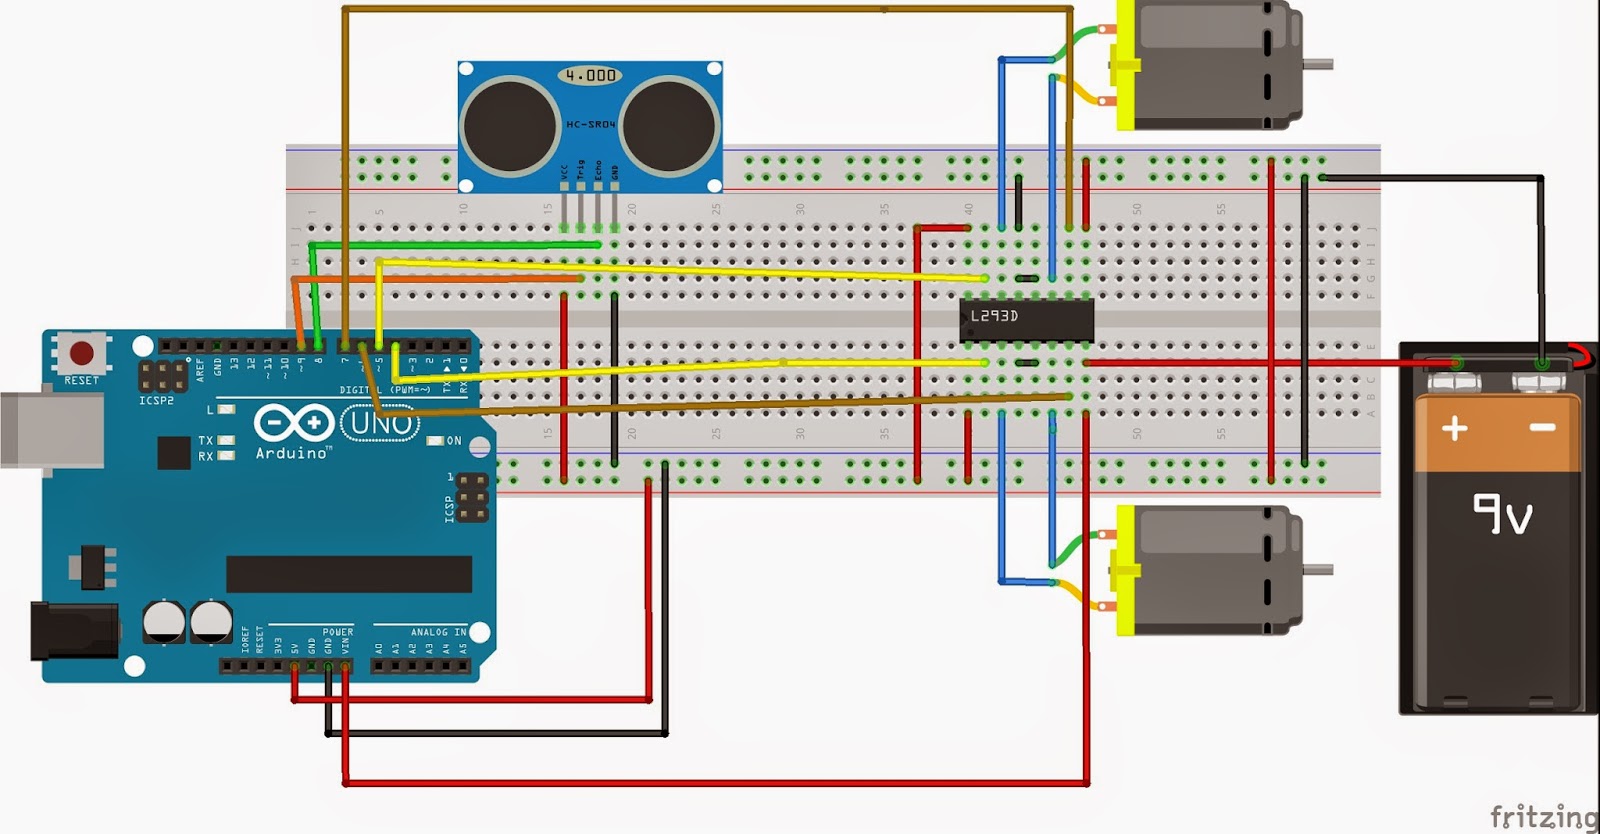
A very simple obstacle avoiding robot using arduino , this robot uses very simple code and can accomplish the task with ease, check out the video for how the robot is working, its really simple to make not much complicated circuit. It uses HC SR-04 sensor which senses distance between the robot and object. If the distance is maximum and robot can move without colliding , the robot moves in forward direction, if the robot senses object near to it, it takes diversion and moves to the safe place and avoiding colliding to any objects around the robot,

Components Used: 

HC SR- 04 (ultrasonic sensor)
L293D Motor driver
2x Gear Motor
2x wheels
1x chasis
1x castor wheel
connecting wires
battery
Arduino Uno 


Circuit Diagram:


--------------------------------------------------------------------------------------------------------------------------
Arduino Program:

/*
 HC-SR04 Ping distance sensor:
 VCC to arduino 5v 
 GND to arduino GND
 Echo to Arduino pin 8 
 Trig to Arduino pin 9*/
#define echopin  8 // echo pin
#define trigpin 9 // Trigger pin


int maximumRange = 30;
long duration, distance;

void setup() {
  Serial.begin (9600);
  pinMode (trigpin, OUTPUT);
  pinMode (echopin, INPUT );
  pinMode (4, OUTPUT);
  pinMode (5, OUTPUT);
  pinMode (13, OUTPUT);
  pinMode (6, OUTPUT);
  pinMode (7, OUTPUT);
}

void loop ()
{

  {
    digitalWrite(trigpin,LOW);
    delayMicroseconds(2);
    
    digitalWrite(trigpin,HIGH);
    delayMicroseconds(10);
    
    duration=pulseIn (echopin,HIGH);
    
    distance= duration/58.2;
    delay (50);
    Serial.println(distance);
  }
  
  if (distance >= 30 ){
    digitalWrite(4,HIGH);
    digitalWrite(5,HIGH);
    digitalWrite(6,LOW);
    digitalWrite(7,LOW);
    delay (200);
  }
  
  else if (distance >=15 && distance <= 25) {
    digitalWrite (4,HIGH);
    digitalWrite (5,LOW);
    digitalWrite (6,LOW);
    digitalWrite (7,LOW);
    delay (1000);
  }
 else if (distance < 15){
   digitalWrite (4, LOW);
   digitalWrite (5, LOW);
   digitalWrite (6,HIGH);
   digitalWrite (7,HIGH);
   delay (1000);
   digitalWrite (4,LOW);
   digitalWrite (5,HIGH);
   digitalWrite (6,LOW);
   digitalWrite (7, LOW);
   delay (1000);
   
     
 }

}

--------------------------------------------------------------------------------------------------------------------------

Very Easy Arduino and Android control Bluetooth Robot

This post is about making a simple Android control Arduino Bot

Required Components:

Arduino Uno 
Bluetooth Module
L293D Motor Driver
2x Gear Motor
1x Chasis
A breadboard 
Connecting wires


Arduino Program
_________________________________________________________________________________

#include <SoftwareSerial.h>

SoftwareSerial BT(10, 11); //TX, RX respetively
String readdata;

void setup() {
 BT.begin(9600);
 Serial.begin(9600);
  pinMode(3, OUTPUT);
  pinMode(4, OUTPUT);
  pinMode(5, OUTPUT);
  pinMode(6, OUTPUT);

}
//-----------------------------------------------------------------------// 
void loop() {
  while (BT.available()){  //Check if there is an available byte to read
  delay(10); //Delay added to make thing stable
  char c = BT.read(); //Conduct a serial read
  readdata += c; //build the string- "forward", "reverse", "left" and "right"
  } 
  if (readdata.length() > 0) {
    Serial.println(readdata);

  if(readdata == "forward")
  {
    digitalWrite(3, HIGH);
    digitalWrite (4, HIGH);
    digitalWrite(5,LOW);
    digitalWrite(6,LOW);
    delay(100);
  }

  else if(readdata == "reverse")
  {
    digitalWrite(3, LOW);
    digitalWrite(4, LOW);
    digitalWrite(5, HIGH);
    digitalWrite(6,HIGH);
    delay(100);
  }

  else if (readdata == "right")
  {
    digitalWrite (3,HIGH);
    digitalWrite (4,LOW);
    digitalWrite (5,LOW);
    digitalWrite (6,LOW);
    delay (100);
   
  }

 else if ( readdata == "left")
 {
   digitalWrite (3, LOW);
   digitalWrite (4, HIGH);
   digitalWrite (5, LOW);
   digitalWrite (6, LOW);
   delay (100);
 }

 else if (readdata == "stop")
 {
   digitalWrite (3, LOW);
   digitalWrite (4, LOW);
   digitalWrite (5, LOW);
   digitalWrite (6, LOW);
   delay (100);
 }


readdata="";}} //Reset the variable